API Management
Security Policy and Access Keys
Introduction
In Tyk, a security policy acts as a template for access control and rate limiting. It can be applied to multiple access keys, OAuth clients, or JWT tokens, allowing you to manage API access at scale. Access keys, on the other hand, are the tokens that clients use to authenticate and access your APIs. These keys can either have their own individual settings or inherit settings from one or more security policies. By leveraging security policies and access keys together, you can:- Standardize access control across multiple users or applications.
- Easily update access rights for groups of users.
- Implement tiered access levels (e.g., basic, premium, enterprise).
- Manage and monitor API usage effectively.
What is a Security Policy
A Tyk security policy incorporates several security options that can be applied to an API key. It acts as a template that can override individual sections of an API key (or identity) in Tyk. For example, if you had 10,000 API keys issued, how would you ensure that all 10,000 users received an upgraded quota or access a new API that you have published? Using policies provides a more scalable and manageable way to control access compared to configuring each key separately, especially when dealing with large numbers of keys. You could manually modify all 10,000 keys, or you could apply a policy to each of those keys when you create them, and then just modify the policy once. Policies can set:- Access lists for API and versions
- Access lists for method and path (granular control)
- Rate limit for a user
- Quota for a user
- Add tags and metadata
Relationship between Security Policy and Access Key
A security policy acts as a template that defines access rights, rate limits, quotas and other security settings whereas an access key (API key) is issued to a client/user to authenticate and access APIs. When creating an access key, you can apply one or more security policies to it. This associates the policy settings with that specific key. The policy settings then override the individual settings on the key itself. This allows you to manage access controls and limits for groups of keys by just modifying the policy, rather than updating each key individually. You can apply multiple policies to a single key, allowing for flexible combinations of access rights. When a request comes in with an access key, Tyk will evaluate the associated policies to determine the permissions and limits for that key. In essence, security policies provide a reusable template of settings that can be easily applied to many access keys, simplifying management and allowing for centralized control of API access and usage limits.Policies Guide
A Tyk policy looks just like the session object that is used when you create a new key:-
The
activeflag must be set totruefor Tyk to load the policy into memory, this makes it easy to enable or disable policies without deleting them. -
Secondly, the
is_inactiveflag applies to the key itself. If you set this value totrue, any key with this policy will be disabled, you can actually set this same value on a key object to make the single key inactive, but as part of a policy it makes it possible to deny access to a whole block of users with a single change.
Trial keys
It is possible to have a policy create “Trial” keys, these are keys with a fixed expiry date set in the number of seconds from the time of the keys creations. Although key expiry can be set in the session object on creation, when a key is created using the portal or a key request it will have a default expiry time. To set a trial key expiry, simply add:Configuring Pro Edition to use a policy list
Tyk Pro (The Dashboard) has policies enabled by default.Configuring the Open Source Edition to use a policy list
If your Tyk configuration is standalone and configuration is being managed via the Gateway API without the support of the dashboard, then you will need to set thepolicies section in your configuration file as follows:
policy_source section is set to file and tells Tyk to look for policy record in the file specified in the policy_record_name field. An example file is shipped with Tyk, and it will look like this:
default.
Applying a policy to a key
To apply the above policy to a key, we simply need to call the/create (or /add) endpoint in the Tyk REST API with a session object that has the apply_policy_id flag set to the name default (or whatever you named your policy).
Although
apply_policy_id is still supported, it is now deprecated. apply_policies is now used to list your policy IDs as an array. This supports the Multiple Policy feature introduced in the v2.4 release.How You Can Create Policies
With the Dashboard API With the Gateway API - Open Source tab With the DashboardSecure your APIs by Method and Path
Tyk already lets you set version access rights, allowed, and blocked paths to control how your users access your APIs, however what has not been easy to do is to restrict access based on specific paths, per key or policy. Granular path control allows you to define which methods and paths a key is allowed to access on a per API-version basis. This can be done on a key-by-key basis, or, for even more power and control, through the Policies feature. With this feature it is possible to set up tiered access policies for your users, so if you offer read only, free and extended access to your APIs and are charging for the higher levels, you can encode these tiers into policies, and use the granular path control feature to limit what paths and methods the keys with those access policies can access. Or, alternatively, you could just upgrade a single key to have more access, both methods use the same, or similar areas of the configuration to make this possible.Granular permissions are applied after version-based (global) allowlist/blocklist rules.
Setting granular paths on a per-key basis
Let’s take a look at a key session definition:access_rights section, in each version definition, we can see an allowed_urls section, here we can define which URLs are enabled in this key as follows:
Using granular control with a key template
This feature is much more powerful when applied to key templates and the policies feature, within the policy definition you can add the same section:Partitioned Policies
Creating a policy where access rights, usage quota and rate limit are set in stone may not suit your use case. Instead, you may wish to have only one or two segments of a token managed at policy level and the other segments managed at key level or by another policy.Example Use Case
You have different tiers of rate limiting as follows:- Tier A has access to the API at a rate of 1000 per 60 seconds
- Tier B a rate of 500 per 60 seconds
- Tier C a rate of 250 per 60 seconds
- The Access Control List (ACL), configured using the
access_rightsfield- When applying partitioned policies to a key, at least one of these policies needs to enforce ACL
- The Rate limit
- The Quota limit
- The GraphQL complexity (currently only query-depth limit is supported)
Set up a partition in an API
You can partition your policy by adding apartitions section to your policy object:
quota: If set totrue, enforce the quota element of this policyrate_limit: If set totrue, enforce the rate limit of this policyacl: If set totrue, enforce the access control rules of this policycomplexity: If set totrue, enforce the GraphQL complexity rules of this policy
Set up a partition in the Tyk Dashboard
Once you have added access rights to your policy, open the Global Limits and Quota panel. You’ll see the Policy Partitioning section where you can uncheck Access Rights, Usage Quota or Rate Limiting to enable their value to be defined at key level. For example, the screenshot below shows that rate limit has not been enforced and therefore can be defined at key level when this policy is applied to a key.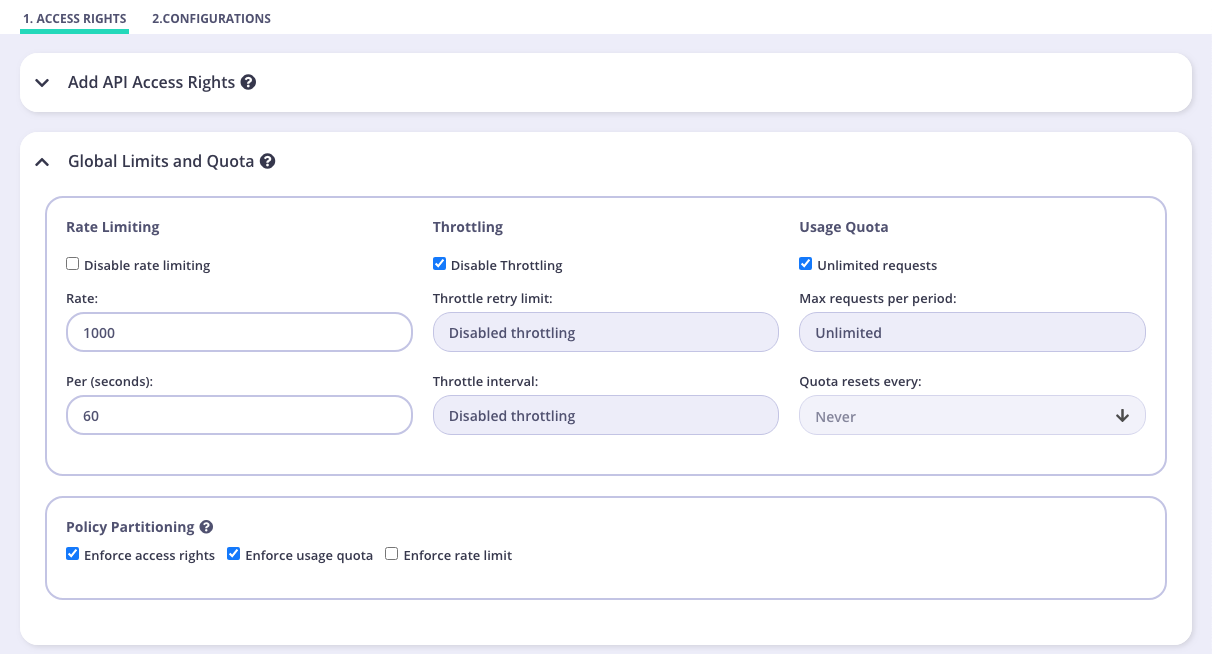
Partitioned Policy Functionality
In Gateway v2.4 and Dashboard v1.4 We extended support for partitioned policies, and you can now apply multiple when creating a key. We’ll cover all combinations and how you can expect the key to react.Applying partitioned policies to a key with the same segments enforced
If you apply partitioned policies to a key with the same segments enforced, you will be able to override any segment that has not been enforced and define new rules specific to that key. Example One - Single Policy: Policy A has access rights and usage quota enforced meaning the rate limiting can be defined at key level. Example Two - Multiple Policies: Policy A and Policy B have access rights and usage quota enforced meaning the rate limiting defined at key level will be inherited by both policies.Use Case
You want to give access to the same API with the same usage quota but define separate rate limits for various developers.Applying partitioned policies to a key with different segments enforced
For ultimate flexibility, you can create policies that each have only one segment enforced. Instead of creating multiple policies that cover a variety of scenarios you can create a few as building blocks to create unique combinations that suit your needs. Example: Policy A has API 1 enforced Policy B has API 2 enforced Policy C has a rate limit of 1000 per 60 seconds enforced Policy D has a rate limit of 2000 per 60 seconds enforced Policy E has an unlimited request usage quota enforced Policy F has 10,000 requests per hour usage quota enforced If Policy A, C and E is applied to a key it will give access to API 1 at a rate of 1000 per 60 seconds with unlimited requests. If Policy A, D and E is applied to a key it will give access to API 1 at a rate of 2000 per 60 seconds with unlimited requests.Use Case
You have 20 developer keys that use a combination of Policy A, B, C, D, E and F and have decided that you’d now like to alter Policy D’s rate limit to 3000 per 60 seconds. All keys with Policy D applied will now inherit the new value instantly. If you had created each of the keys without using policies you would have to find and edit each key manually.Applying both a partitioned policy and a non-partitioned policy to a key
If you apply both a partitioned policy and a non-partitioned policy to the same key, any segments that have not been enforced in the partitioned policy will inherit the values in the non-partitioned policy.Example
Policy A has enforced access to API 1 with a rate limit of 1000 per 60 seconds and unlimited requests for the usage quota. Policy B only has enforced access to API 2 If both policies were applied to a key, Policy B would automatically inherit Policy A’s rate limit and usage quota because Policy B did not have rate limit or usage quota enforced.Use Case
A developer already has a key that gives access to Policy A and now requires access to another API product. The developer is already paying for a specific rate and limit and just needs access to the additional API. Instead of editing Policy A to allow for the additional API access (which would then affect all keys with this policy applied), we can instead create Policy B and combine the two, allowing the additional API in Policy B to inherit the same rate and limit the developer requires.For v2.4 and 1.4 multiple policies are only supported only via the Add Key section and via the API.
Support oAuth, and Portal API Catalogs are planned for subsequent releases.
Support of multiple policies for JWT and OIDC is done through the API definition when using scopes.
Access Keys
Access Key Expiry
Key Expiry allows you to set the lifetime of tokens, ensuring a regular re-cycling of API tokens. If a key has expired Tyk will no longer let requests through on a token, however this does not mean that Tyk will remove the key.Token Expiry Behavior and Time-To-Live
If a key is expired, Tyk will return a warning that the token has expired to the end user. If a token has been deleted, then Tyk will return an access denied response to the client. This is an important difference. In some cases, API tokens are hard-coded (this is terrible practice, but it does happen far more often than you might think). In this case it is extremely expensive to replace the token if it has expired. In the above case, if a token had been deleted because the Time To Live of the token matched it’s expiry time, then the end user would need to replace the token with a new one. However, because we do not expire the key it is possible for an administrator to reset the expiry of the token to allow access and manage renewal in a more granular way.Timestamp format on a session object
Tyk manages timestamps in the Unix timestamp format - this means that when a date is set for expiry it should be converted to a Unix timestamp (usually a large integer) which shows seconds since the epoch (Jan 1 1970). This format is used because it allows for faster processing and takes into account timezone differences without needing localisation. Key sessions are created and updated using the Tyk Gateway API, in order to set the expiry date for a key, update theexpires value with a Unix timestamp of when the key should expire.
expires can only be a positive number, or 0 if you don’t want the key to expire.How to delete expired tokens
In order to not clutter the database with expired tokens, Tyk provides a way to force a TTL on all keys, this is a maximum time to live and should always be significantly larger than your maximum expiry setting. This setting must be set on a per-API basis. To enforce a TTL, set thesession_lifetime value (in seconds) in your API Definition Object, this will need to be managed via the Dashboard REST API.
Access Key Hashing
Tyk stores all API Tokens and their equivalent Session Objects in a Redis DB. Because of this, Tyk will, by default, obfuscate the tokens in Redis using a key hash.Default Key Hash Algorithm
To find a balance between performance and security, the default algorithm used by Tyk to do the hashing ismurmur3, and serves more to obfuscate than to cryptographically secure the tokens.
It is possible to disable key hashing in Tyk using hash_keys set to false in your tyk.conf and tyk_analytics.conf.
See the Gateway Configuration Options for more details.
Custom Key Hash Algorithms
To set a custom algorithm, you need to sethash_key_function in your tyk.conf to one of the following options:
murmur32murmur64murmur128sha256
sha256 cryptographic key hashing algorithm, for cases when you are willing to sacrifice some performance for additional security.
Performance wise, setting new key hashing algorithms can increase the key hash length, as well as key length itself, so expect that your analytics data size to grow (but not that much, up to about 10%). Additionally, if you set the sha256 algorithm, it will significantly slowdown Tyk, because cryptographic functions are slow by design but very secure.
Technically wise, it is implemented by new key generation algorithms, which now embed additional metadata to the key itself, and if you are curious about the actual implementation details, feel free to check the following pull request.
Changing hashing algorithm is entirely backward compatible. All your existing keys will continue working with the old murmur32 hashing algorithm, and your new keys will use the algorithm specified in your tyk.conf. Moreover, changing algorithms is also backward compatible, and Tyk will maintain keys with multiple hashing algorithms without any issues.
A hashed installation imposes some constraints on how Tyk is used:
-
Listing tokens requires setting
enable_hashed_keys_listingtotruein yourtyk.conffile -
Tokens appear in Analytics in their hashed form
Switching from a hashed installation to non-hashed means all existing tokens cannot be used (they will not be correctly validated).
Using Hashed Keys Endpoints
- endpoints
POST /keys/create,POST /keysandPOST /keys/{keyName}also return the field"key_hash"for future use - endpoint
GET /keysget all (or per API) key hashes. You can disable this endpoint by using the newtyk.confsettingenable_hashed_keys_listing(set tofalseby default) - endpoint
GET /keys/{keyName}was modified to be able to get a key by hash. You just need provide the key hash as akeyNameand call it with the new optional query parameterhashed=true. So the new format isGET /keys/{keyName}?hashed=true" - we also have the same optional parameter for endpoint
DELETE /keys/{keyName}?hashed=trueand call it with the optional query parameterhashed=true. So the format isGET /keys/{keyName}?hashed=true" - The same optional parameter is available for the
DELETE /keys/{keyName}?hashed=trueendpoint
Access Key Level Security
Tyk supports the concept of access control at the key level. Access control is managed via three important settings in a session object. In order to be fully clear on how Tyk handles access control, it’s worth looking at the key settings that go into a user session object. A full description of each of the options can be found in the Tyk Gateway API documentation. Tyk will store each access key as a record in your Redis database, and this key will have certain metadata attached to it. The record takes this form:allowance&rate: these should be set to the same value, these are the users allowance during a period as set byper.per: The time in seconds where a rate limit is applied.expires: The date when the key expires. Note:expirescan only be a positive number, or -1 (unlimited).quota_max: The usage quota for the user. Note:quota_maxcan only be a positive number, or -1 (unlimited).quota_renews: the Unix timestamp when the quota is renewed.quota_renewal_rate: The time, in seconds, of when the quota gets renewed (e.g. 86400 would represent 1 day).
Rate limiting
Also known as throttling, the API will actively only allow a key to make x requests per y time period. this is very useful if you want to ensure your API does not get flooded with requests. In order to apply a rate limit:- Ensure that
allowanceandrateare set to the same value, this should be number of requests to be allowed in a time period, so if you wanted 100 requests every second, set this value to 100. - Ensure that
peris set to the time limit. Again, as in the above example, if you wanted 100 requests per second, set this value to 1. If you wanted 100 per 5 seconds, set this value to 5 etc.
Quotas
A quota is similar to a rate limit, as it allows a certain number of requests through in a time period. However, traditionally these periods are much longer, so for example if you would like to limit a user to only 10,000 requests to the API per month, you can create a key that has no rate limiting but will disallow access once the quota is empty. Tyk will automatically reset the quota if the time limit on reset has been exceeded. In order to set a quota for a user:- Ensure that
quota_maxis set to the maximum amount of requests that a user is allowed to make in a time period. - Ensure
quota_remainingis set to the same value asquota_max, this is the value that will decrement on each request (failed or successful). - Set the
quota_renewal_rateto the value, in seconds, of when the quota should renew. For example, if you would like it to renew every 30 days, you would have2592000seconds (((60*60) * 24) * 30 = 2592000).
quota_max to -1.
quota_max can only be a positive number, or -1 (unlimited).Key Expiry
If you set a date in the key expiry field, when the key is created (or updated), the expiry time is also set as the keys deletion time from Redis. If a key has expired Tyk will no longer let requests through on this key. Tyk manages timestamps in the Unix timestamp format - this means that when a date is set for expiry it should be converted to a Unix timestamp (usually a large integer) which shows seconds since the epoch (Jan 1 1970). This format is used because it allows for faster processing and takes into account timezone differences without needing localisation. Key sessions are created and updated using the Tyk REST API, in order to set the expiry date for a key, update theexpires value with the timestamp of when the key should expire.
Leave this field empty for it never to expire.
Understanding Tyk Session
What is a Session Object
In Tyk, all identities are mapped to a session object. Identities can be in the form of Bearer Tokens, HMAC Keys, JSON Web Tokens, OpenID Connect identities and Basic Auth users. You should think about a session object as the metadata associated with a user, or the identity trying to gain access to your services. In Tyk, a session object encapsulates the following details for any given identity:- What rate limit to apply
- What quota to apply
- What Access Control List to apply
- What policy ID to use to override the above (if set)
- When the session holder’s access expires
- Metadata (a string key/value map that can hold any data)
-
Alias (a human-readable name for the identity)
Expiry is not the same as invalidation, in Tyk, a session object will be “expired” but will still be in the database in order to inform the session owner that their token has expired and they should renew, if the token was invalidated (deleted after the expiry period), then the user would simply be denied access and their token would be invalid. This is important for developers that have (but shouldn’t) hard-coded their token into their app so it is hard to change.
Where are session objects stored?
Session objects are stored in Redis, not in MongoDB or in the Gateway itself. Session objects are stored as a token string / JSON object key/value pair in the Redis DB. By default, the token itself is hashed and therefore obfuscated, this means using the Alias is important to identify token data in analytics and logs.Where can I get more information?
A session object is just a JSON object. For more details of each parameter in the session object, see Tyk Token Session Object Details.Session Object
-
last_check(deprecated): No longer used, but this value is related to rate limiting. -
allowance(deprecated): No longer directly used, this value, no key creation, should be the same asrate. -
rate: The number of requests that are allowed in the specified rate limiting window. -
per: The number of seconds that the rate window should encompass. -
expires: A Unix timestamp that defines when the key should expire. You can set this to0(zero) if you don’t want the key to expire. -
quota_max: The maximum number of requests allowed during the quota period. -
quota_renews: An epoch that defines when the quota renews. -
quota_remaining: The number of requests remaining for this user’s quota (unrelated to rate limit). -
quota_renewal_rate: The time, in seconds. during which the quota is valid. So for1000requests per hour, this value would be3600whilequota_maxandquota_remainingwould be1000. -
access_rights: This section is defined in the Access Control section of this documentation, use this section define what APIs and versions this token has access to. -
org_id: The organization this user belongs to, this can be used in conjunction with theorg_idsetting in the API Definition object to have tokens “owned” by organizations. See the Organizations Quotas section of the Tyk Gateway API. -
oauth_client_id: This is set by Tyk if the token is generated by an OAuth client during an OAuth authorization flow. -
basic_auth_data: This section defines the basic auth password and hashing method. -
jwt_data: This section contains a JWT shared secret if the ID matches a JWT ID. -
hmac_enabled: If this token belongs to an HMAC user, this will set the token as a valid HMAC provider. -
hmac_string: The value of the HMAC shared secret. -
is_inactive: Set this value totrueto deny access. -
apply_policy_id(supported but now deprecated): The policy ID that is bound to this token. -
apply_policies: This replacesapply_policy_idand lists your policy IDs as an array. This supports the Multiple Policy feature introduced in the v2.4 of the Gateway. -
data_expires: An value, in seconds, that defines when data generated by this token expires in the analytics DB (must be using Pro edition and MongoDB). -
monitor: Rate monitor trigger settings, defined elsewhere in the documentation. -
meta_data: Metadata to be included as part of the session, this is a key/value string map that can be used in other middleware such as transforms and header injection to embed user-specific data into a request, or alternatively to query the providence of a key. -
tags: Tags are embedded into analytics data when the request completes. If a policy has tags, those tags will supersede the ones carried by the token (they will be overwritten). -
alias: As of v2.1, an Alias offers a way to identify a token in a more human-readable manner, add an Alias to a token in order to have the data transferred into Analytics later on so you can track both hashed and un-hashed tokens to a meaningful identifier that doesn’t expose the security of the underlying token.
What is a Session Metadata
As described in What is a Session Object?, all Tyk tokens can contain a metadata field. This field is a string key/value map that can store any kind of information about the underlying identity of a session. The metadata field is important, because it can be used in various ways:- to inform an admin of the provenance of a token
- values can be injected into headers for upstream services to consume (e.g. a user ID or an email address provided at the time of creation)
- values can be used in dynamic JavaScript middleware and Virtual Endpoints for further validation or request modification
Middleware that can use metadata
Metadata is exposed in several middleware for use in the middleware configuration:- URL Rewrite
- Request Header Transformation
- Response Header Transformation
- Request Body Transformation
- Response Body Transformation
- Virtual Endpoints